You built an app without writing a single line of code. Good. Now your users want smarter features: a chatbot that actually understands them, content that generates on demand, data that predicts instead of just reports. The problem is that most guides on “integrating AI” assume you have a backend engineer sitting next to you. You don’t.
This guide walks through exactly How to Integrate AI features to a no-code app, from picking the right AI service to wiring it up inside your existing build. No vague overviews. No assumed coding knowledge. By the end, you’ll know which AI layer fits which use case, how to connect it without breaking what you’ve already built, and where to call in expert help when you actually need it. If you’re still deciding whether to build your app first, the AI prompts guide for turning ideas into apps covers that foundation well.
Launch Your App Today
Ready to launch? Skip the tech stress. Describe, Build, Launch in three simple steps.
BuildTL;DR: Integrating AI into a no-code app means connecting your app to an external AI service (like OpenAI’s API) via a webhook, HTTP request, or pre-built connector. According to Gartner, 70% of new enterprise applications will use no-code or low-code tools by 2025, and AI features are now table stakes for competitive apps. The fastest path is matching your use case to the right AI provider and using your platform’s native API action or connector to link them.
What Does “AI Integration” Actually Mean for a No-Code App?
AI integration in a no-code context means connecting your app to an external model or service that processes language, images, or structured data and returns a useful output. It does not mean training a model from scratch or writing machine learning code. You are a consumer of AI, not a builder of it.
No-code platforms can cut app development time by up to 90% GofP, and adding AI follows the same principle: you describe what you want, connect the service, and configure the output. The actual model runs on someone else’s infrastructure. You pay per use, typically in fractions of a cent per interaction.
Most non-technical founders discover this pattern late. They spend weeks searching for a “no-code AI tool” when what they actually need is to connect an API action inside the builder they are already using. The terminology is the blocker, not the technology.
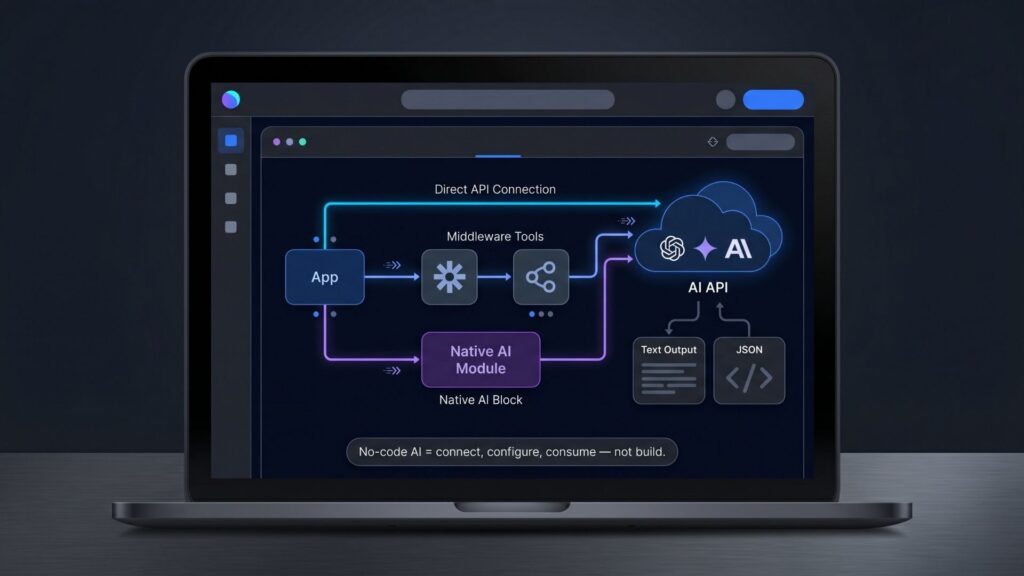
There are three primary integration patterns to know:
Direct API calls: Your app sends a request directly to an AI provider (OpenAI, Anthropic, Google Gemini) and receives a text or structured JSON response. This gives you the most control and is cheaper at scale.
Middleware connectors: Tools like Zapier or Make sit between your app and the AI provider. They handle authentication and data formatting. Faster to set up, slightly less flexible, and you pay a per-task fee on top of the AI usage fee.
Native AI blocks: Some platforms now include built-in AI actions (Bubble’s API Connector, for example) that abstract the request setup. These are the fastest starting point if your platform offers them.
For a deeper look at how no-code and AI development models compare, see no-code vs low-code for startups.
Which AI Use Cases Actually Work in No-Code Apps?
Not every AI feature is equally straightforward to add to a no-code app. The ones that work well share a common trait: they take a defined input, call an AI service, and return a clean output your app can display or act on.
No-code platforms allow for shortening project implementation time by 60 to 80% compared to traditional development cycles Dsstream, according to DS Stream’s analysis of the 2025 no-code landscape. The same efficiency applies when adding AI features: the constraint is usually data design, not the AI call itself.
These use cases work reliably in no-code apps:
AI-generated text content. A user fills out a form (business name, tone, product category), your app sends those fields to OpenAI’s Chat Completions API, and returns a generated description, email, or product blurb. This is the most common first integration because the input and output are both plain text.
Conversational support chatbots. Your app stores a conversation thread in a database, sends the thread plus a system prompt to an AI provider, and displays the response in a chat interface. Before AI agent tools matured, building a working AI chatbot for your website required a development team and weeks of testing. Today the same result takes roughly 15 minutes of configuration. DEV Community
AI-powered search and filtering. Your app sends a user’s natural language query to an embedding or search API, which returns ranked results from your own database. This is more complex to configure but achievable in most mature no-code platforms.
Document summarization. Users upload a PDF or paste text. Your app sends the content to an AI API with a summarization instruction. The response renders on screen or gets saved to the user’s record.
Sentiment and classification. Your app passes user-submitted text to an AI endpoint that returns a category label or score. Useful for feedback analysis, lead qualification, or content moderation.
The use cases that fail are usually not AI failures. They fail because the no-code app’s data model was not designed with AI output in mind. If your database fields are too generic or your workflows don’t have a place to store the AI response, the integration stalls at the design layer, not the technical one. Before adding any AI feature, map out exactly where the response will live in your data structure.
Founders who have shipped apps using this pattern document their experience in posts like how a non-developer launched a startup app with no-code.
How Do You Connect an AI API to a No-Code App Step by Step?
The process is the same regardless of which AI provider or no-code platform you use. The specific labels change. The sequence does not.
AI-driven development accelerates prototyping by 40 to 50% through intelligent code generation and workflow suggestions Integrate.io, according to Integrate.io’s 2026 analysis of the no-code market. Connecting an external AI API follows the same fast-loop principle.
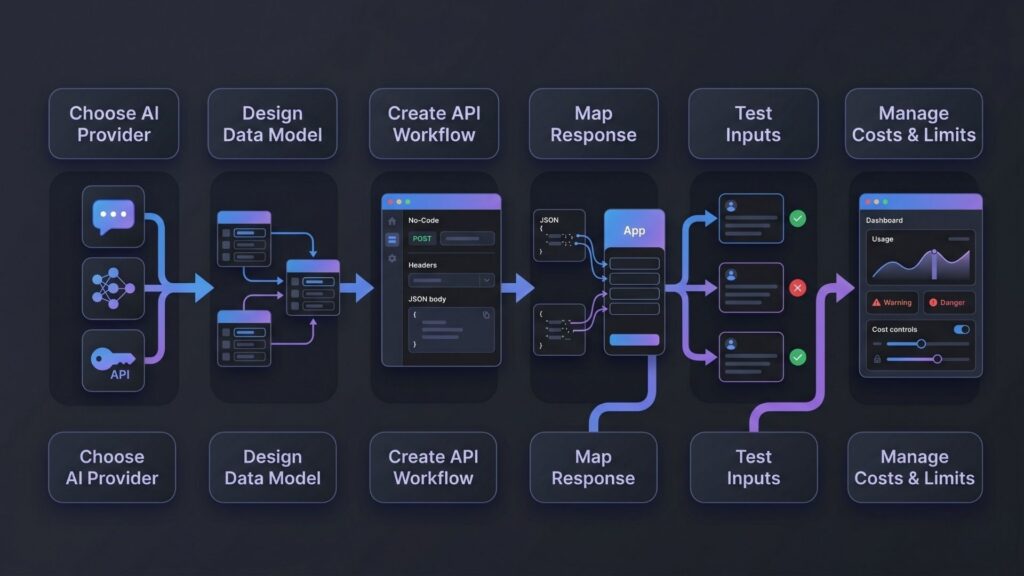
Step 1: Choose your AI provider and get an API key.
OpenAI is the default choice for text generation and chatbots. Google Gemini and Anthropic Claude are credible alternatives with different pricing models. For image generation, Stability AI or OpenAI’s DALL-E both offer API access. As of 2025, GPT-4 pricing is roughly $3 per 1 million input tokens and $12 per 1 million output tokens Social Intents, which translates to cents per typical user interaction. Obtain an API key from your provider’s developer console and store it securely.
Step 2: Design your data model first.
Before wiring up any API call, decide where the input comes from (a form field, a text record, an uploaded file) and where the output goes (a text field in the same record, a new table entry, a temporary display variable). This step saves hours of rework.
Step 3: Create the API action or workflow.
In most no-code platforms, this means creating a new API connector or HTTP action that points to the provider’s endpoint URL. Set the method to POST, add your API key as an Authorization header (format: Bearer YOUR_API_KEY), and configure the request body to include your model name, the system prompt, and the user’s input field mapped dynamically.
Step 4: Map the response to your data.
The AI provider returns a JSON object. The actual text lives inside a nested path, typically something like choices[0].message.content for OpenAI. Use your platform’s response mapping tool to extract that value and write it to the correct field in your database or display variable.
Step 5: Test with real inputs.
Run the action manually with three or four realistic inputs before connecting it to your live user flow. Check for edge cases: empty inputs, unusually long text, non-English characters. Add a fallback message for when the API returns an error.
Step 6: Handle costs and rate limits.
Set a usage cap on your AI provider account. Add simple validation in your no-code workflow to prevent blank or junk inputs from triggering paid API calls. If you expect high volume, consider caching common responses in your database rather than calling the API on every request.
The single step founders skip most often is Step 2. They connect the API successfully, get a response back, then realize they have nowhere to save it. Designing the data model before the integration saves a full rebuild.
For a practical look at the kind of apps this enables, building complex apps with imagine.bo walks through real production builds.
What Should You Know About Prompts Before You Integrate?
The AI response your app produces is only as useful as the prompt that generates it. This is the part most integration guides skip, and it is where most no-code AI features underperform.
According to Gartner, nearly 60% of custom apps are now built outside IT departments CodeConductor, and the people building them are not machine learning specialists. Writing effective system prompts is a skill that takes iteration, but the fundamentals are learnable in an afternoon.
System prompts set the behavior. The system prompt is the instruction you give the AI before the user’s input arrives. It tells the model what role to play, what format to return, what to include and exclude, and how to handle edge cases. A weak system prompt produces inconsistent, generic output. A specific one produces output that feels like it was built for your app.
Use structured output prompts. If your app needs to display data in a specific format (a bulleted list, a JSON object, a specific word count), say so explicitly in the system prompt. Example: “Return your response as a JSON object with two keys: ‘headline’ (under 10 words) and ‘body’ (under 50 words).” This makes parsing predictable.
Include context from your app’s data. The most powerful integrations inject user-specific data into the prompt dynamically. A SaaS tool that generates personalized onboarding emails, for example, passes the user’s name, plan type, and first action into the prompt at the moment of generation. The AI’s output is then genuinely relevant, not generic.
Test prompts before you build workflows. Use the AI provider’s playground interface to iterate on your system prompt before wiring it into your app. This is faster than running full app tests for each prompt change.
The fundamentals of building apps through conversational prompts also apply here. The prompt-driven development approach article covers why this method consistently beats configuration-heavy alternatives.
How Does imagine.bo Handle AI Integration Differently?
Most no-code platforms treat AI integration as a plugin you add after you build. imagine.bo treats it as a first principle of the build itself.
Based on the platform’s Describe-to-Build workflow, when you describe an app that includes AI features in plain English, imagine.bo generates the AI-connected backend logic, the API call structure, the data schema to store responses, and the frontend display layer together as a single coherent build, rather than as separate pieces you wire together manually. This eliminates the Step 2 failure pattern described above.
The global no-code AI platform market is growing at a 38.2% CAGR from 2026 to 2029, reaching $24.8 billion Adalo Blog (UserGuiding AI Integration Market Analysis). The platforms gaining share in that growth are those that treat AI as native infrastructure, not an optional add-on.
When you build on imagine.bo, the AI integration workflow looks like this:
Describe the feature in plain English. Tell the Describe-to-Build interface what you want: “Add a feature where users can paste a job description and receive a tailored cover letter draft.” The AI-Generated Blueprint maps this to a data model, a backend API call to the AI provider, a processing endpoint, and a frontend display component.
Review the blueprint before building. The platform shows you the full technical plan before a single line of code is generated. You can revise the prompt, adjust the scope, or narrow the feature before committing build credits.
Iterate through conversation. If the initial output is not quite right, you describe the change the same way you described the original feature. No visual editor to navigate. No plugin configuration panels. Just describe what is wrong and what you want instead.
Where AI hits a limit, use Hire a Human. For edge cases that require custom API logic or a non-standard AI provider integration, the Hire a Human feature connects you to a vetted engineer directly from your dashboard. The engineer works inside the same project you built. No handoff friction, no new codebase to explain.
For founders who want to understand the full capability of building AI-powered SaaS products on this model, how to build a SaaS with AI and no-code is a direct follow-on read.
What Are the Common Mistakes Founders Make When Adding AI to Apps?
Knowing what breaks these integrations before you start saves real time and real money.
No-code tools have many benefits but also known limitations, including customization limits, scalability concerns, and integration difficulties when linking no-code apps with other systems Momen, and AI integrations surface all three simultaneously for unprepared builders.
Mistake 1: Using AI for every feature. Not every feature is better with AI. Dropdown menus, form validation, file uploads, and notification rules do not need AI. Reserve AI calls for tasks that genuinely require language understanding or content generation. Using AI indiscriminately drives up API costs and slows down your app.
Mistake 2: Skipping error handling. AI APIs return errors. Rate limits, provider outages, malformed requests, and context window overflows all produce error responses. If your no-code workflow does not handle these, your users see broken interfaces with no explanation. Add a fallback condition to every AI action that catches non-200 responses and displays a plain error message.
Mistake 3: Exposing your API key in the frontend. If your no-code platform makes API calls directly from the browser and you store the API key in a visible variable, any user can extract it and run queries at your expense. Route all AI calls through a backend workflow, not a frontend action, wherever your platform allows it.
Mistake 4: Not version-controlling your prompts. Your system prompts are part of your product. When you change one and the output quality drops, you need to be able to roll back. Keep a simple document with dated versions of every system prompt your app uses.
Mistake 5: Building before validating the output. Generate 20 to 30 realistic AI outputs from your prompt before building any user-facing feature around them. If the output quality is inconsistent at this stage, no amount of UI polish will fix it later.
The indie hacker AI tools guide covers a broader toolkit perspective for solo builders shipping products with AI at the core.
Frequently Asked Questions
How much does it cost to add AI to a no-code app?
The cost depends on usage volume and the AI provider you choose. As of 2025, GPT-4 pricing runs approximately $3 per million input tokens and $12 per million output tokens Social Intents, which typically means less than $5 per month for small apps with under 500 daily AI interactions. Factor in a middleware tool fee (Zapier or Make) if you use one, plus any per-action charges from your no-code platform.
Do I need a paid plan on my no-code platform to connect an AI API?
In most cases, yes. Free plans on platforms like Bubble, Adalo, and others typically restrict custom API connectors or HTTP actions to paid tiers. 72% of users successfully develop applications in three months or less using low-code platforms Adalo Blog, and most of that speed comes from paid-tier features including API integrations. Budget for at least a starter paid plan before attempting an AI integration.
What is the simplest AI feature to add as a first integration?
Text generation from a form input is the most forgiving first integration. The input is a single text field. The output is a single text field. The API call is a standard POST request with a simple JSON body. There are no files, no embeddings, and no conversation history to manage. Start here, get it working, then add complexity.
Can AI integrations in no-code apps scale to real production traffic?
Yes, with planning. More than 75% of low-code market revenue comes from cloud deployments by 2026 Integrate.io, indicating cloud infrastructure is the standard. AI API providers scale automatically. The scaling constraint is usually your no-code platform’s database performance or workflow execution limits, not the AI layer. Review your platform’s capacity limits before launch if you expect significant volume.
Is imagine.bo better for AI-integrated apps than other no-code builders?
For full-stack apps where AI is a core feature rather than a bolt-on, yes. Real-world implementations show projects completing in 3 to 4 weeks that previously required 6 to 8 months using traditional development methods Integrate.io. imagine.bo’s Describe-to-Build approach generates the backend logic, data schema, and frontend display layer together, which eliminates the most common integration failure point: a data model that was not designed to receive AI output. For simple static sites or forms-only tools, a lighter platform may be sufficient.
What Are the Three Things to Take Away From This Guide?
First, AI integration in a no-code app is a data design problem before it is a technical one. Get your data model right before you connect a single API. Know where the AI output will be stored and displayed before you write the first API action.
Second, start with text generation from a form input. It is the simplest, cheapest, and most forgiving first integration. Get one AI feature working end-to-end before adding a second. Each integration teaches you something the next one benefits from.
Third, the gap between a basic no-code app and a genuinely intelligent product is smaller than most founders think. It is often one well-configured API call, one good system prompt, and one workflow that stores the response correctly. You do not need a developer for this. You need the right mental model and the willingness to test.
If you are ready to build an app where AI is part of the core architecture from day one, not a plugin added after the fact, the fastest path is describing your app to imagine.bo and reviewing the AI-Generated Blueprint before committing a single credit. For founders operating solo who want to understand the full scope of what is possible, single-person startups with AI enterprise strategy is worth reading alongside this guide.
Launch Your App Today
Ready to launch? Skip the tech stress. Describe, Build, Launch in three simple steps.
Build