A developer-reviewed guide to architecture, access control, billing, and tenant isolation — built without code.
Most no-code tutorials hand you a to-do app and call it a SaaS. Real SaaS means each paying customer gets their own isolated workspace, their own users, their own data. That is multi-tenancy. Get it wrong and one customer accidentally sees another’s records. That is not a minor bug — it is a product-ending incident.

This guide walks through exactly how to build a multi-tenant SaaS platform without code, using imagine.bo as the build environment. Every step has been reviewed for security accuracy, so you understand not just what to do, but why each decision matters architecturally. If you have been researching building a tech startup without a developer, this is the step that turns that idea into a product people actually pay for.
TL;DR Multi-tenant SaaS lets multiple customers share one application while keeping their data strictly separate. According to Gartner, over 65% of application development activity will use low-code and no-code tools by 2026. With imagine.bo, you can specify tenant isolation, user roles, billing, and deployment in plain English using Describe-to-Build and launch a production-ready multi-tenant SaaS — but only if you understand the architecture you are specifying. This guide covers that in full.
What Is Multi-Tenancy, and Why Does Your SaaS Need It?
Multi-tenancy means one running application serves many customers simultaneously. Each customer, called a tenant, gets their own workspace where their data never touches another tenant’s. This is how every major SaaS product works, from Slack to HubSpot to Notion. The alternative — spinning up a separate application instance for each customer — costs roughly four to five times more in infrastructure and becomes unmanageable within months.
You might also like: Multi-Tenant SaaS for Beginners
According to Grand View Research, the global SaaS market is projected to exceed $900 billion by 2030, growing at an 18.7% compound annual growth rate. Cloud cost benchmarks from AWS and Azure consistently show per-tenant infrastructure costs in shared-instance multi-tenant models running 40 to 60 percent lower than equivalent dedicated single-tenant deployments.
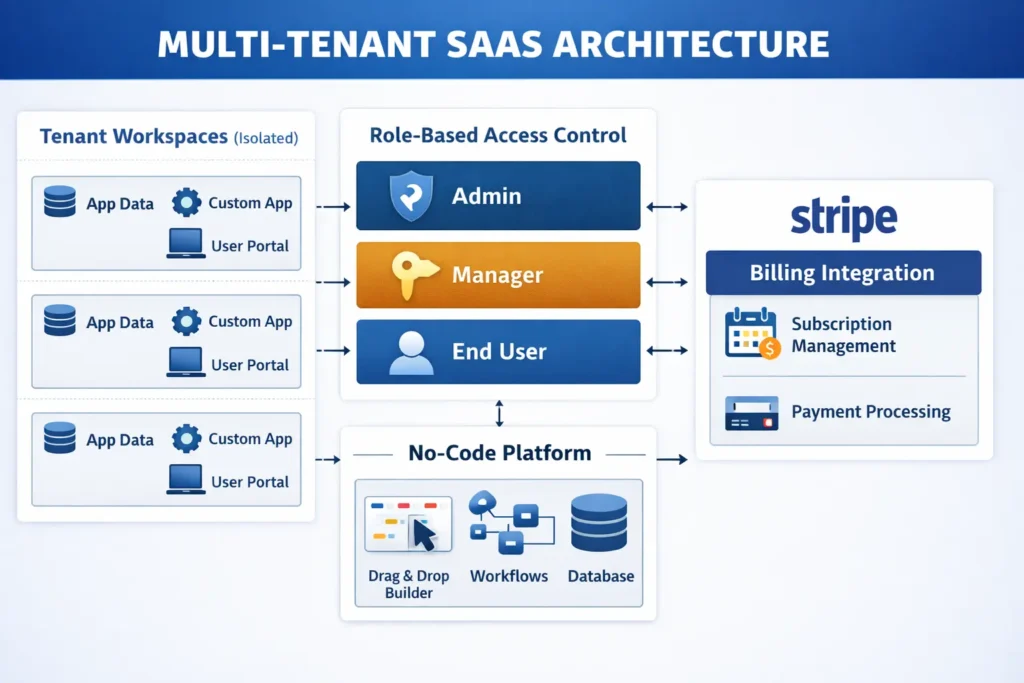
The three pillars of multi-tenancy are:
- Data isolation: Each tenant’s records stay completely separate at the database layer.
- Role-based access control: Different users within one tenant have different permissions, enforced server-side.
- Workspace customization: Each tenant can configure their own experience without affecting others.
Get these three right and you have a real SaaS product. Miss any one and you have an expensive prototype.
Step 1: Design Your Data Architecture With Describe-to-Build
Most non-technical founders skip architecture and regret it by month two. The instinct is to build something and fix the structure later. With multi-tenancy, that approach means rewriting your entire database schema while live customer data sits inside it. You need to define the tenant relationship correctly before your first user signs up, not after.

In imagine.bo, you use the Describe-to-Build feature to specify your data model in plain language. The AI-Generated Blueprint translates that description into a production database schema. A prompt that generates the right foundation looks like this:
Example Prompt
“Build a SaaS project management tool where each company has its own workspace. Each workspace has its own projects, tasks, and team members. No user should ever see data from another company. Each company should have an admin who can invite members and manage settings.”
That description generates a schema with a Tenants table, a Users table linked to a non-nullable Tenant ID foreign key, and a Projects table scoped to the same Tenant ID.
Security Note: Orphaned Record Risk
The most common data-leak vector in no-code SaaS builds is the orphaned record — a database entry that exists without a tenant association and becomes accessible to anyone. The fix is structural, not behavioral: your Tenant ID column must be a non-nullable foreign key at the database level. This means the database itself rejects any record inserted without a valid tenant association, regardless of what the application layer does. In your Describe-to-Build prompt, include this explicitly: “Every data record must have a tenant_id that is a required, non-nullable foreign key referencing the Tenants table. No record should be insertable without a valid tenant association.”
Forrester Research found that no-code and low-code platforms reduce application development time by up to 90% compared to traditional coding methods. For multi-tenant SaaS specifically, the critical architectural decisions happen at the data-model stage — before any interface is built.
Step 2: Set Up User Roles and Workspace Separation
Here is where most no-code SaaS builds fall apart. The builder correctly creates tenant-isolated data but creates a single generic user role with access to everything. Role-based access control is not optional in a B2B SaaS product. Enterprise buyers specifically check for it before signing contracts, and they will ask whether it is enforced at the API layer or only at the UI layer. Those are very different things.

Defining Your Roles
For a typical B2B SaaS, you need at minimum:
- Admin: Full control within their tenant — user management, billing, all data.
- Member: Standard operational access — create and edit records, no delete or billing.
- Viewer: Read-only access — no changes of any kind.
Critical: Where RBAC Enforcement Must Happen
There is a meaningful difference between RBAC enforced at the UI layer and RBAC enforced at the API layer. UI-layer enforcement only hides buttons and pages — any user with basic developer tools knowledge can make direct API calls that bypass the interface entirely. Server-side enforcement means every API endpoint checks the caller’s role before returning or modifying data. When using imagine.bo’s Describe-to-Build, explicitly state: “All role checks must be enforced server-side on every API request, not only at the UI level. An authenticated API call from a Member role must not be able to access billing or deletion endpoints regardless of how the request is constructed.”
The Super Admin Role: Handle With Care
Some products add a Super Admin role that operates across all tenants — useful for your internal customer support and account management team. This sounds simple but requires a more rigorous approach than a standard role:
- Super Admin sessions must be isolated from standard user sessions. A support agent should not log in as a tenant user — they should authenticate through a separate internal admin interface.
- Every action taken under a Super Admin session should be logged with a full audit trail: which tenant’s data was accessed, when, and by whom.
- Cross-tenant access permissions should be scope-limited. A support agent resolving a billing issue does not need write access to a tenant’s application data.
Session Security: Token Expiry and Tenant Context
imagine.bo handles tenant context through session-scoped filtering — the moment a user authenticates, every subsequent request is filtered to their tenant’s data. One detail that must be specified: session tokens need expiry and refresh logic. A stolen or reused session token carries that user’s full tenant context until the token expires. Without expiry, a compromised token gives an attacker persistent access. In your build description, include: “Session tokens must expire after [X] minutes of inactivity. Implement a refresh token mechanism that issues new access tokens without requiring full re-login, and invalidate refresh tokens on logout.”
According to Verizon’s 2024 Data Breach Investigations Report, 68% of data breaches involve a human element, and misconfigured access controls are among the leading technical causes of SaaS data exposure incidents. Server-side role enforcement is now a baseline requirement that enterprise B2B buyers verify before committing to SaaS vendors.
Step 3: Automate Tenant Onboarding So You Never Do It Manually
Here is a calculation worth running before launch: if onboarding each new customer requires 20 minutes of manual admin work and you close 50 customers in your first six months, that is over 16 hours of onboarding time generating zero revenue. At 500 customers, it becomes a part-time job that exists purely to maintain growth you have already achieved. Automated tenant onboarding is a business model requirement, not a convenience feature.
In imagine.bo, you describe the onboarding flow the same way you described the data architecture. A typical automated flow:
- User signs up with email and password.
- System creates a new Tenant record and assigns that user as Admin.
- System sends a welcome email with workspace name and a link to invite teammates.
- User lands on a pre-configured empty dashboard with clear next steps.
- No manual approval from you required.
One edge case worth specifying upfront: what happens if someone signs up with an email domain already associated with an existing tenant? Should they join that workspace or create a new one? Include this in your prompt to avoid a confusing user experience problem after launch.
According to SaaS benchmarking data from ChartMogul, products with fully automated self-serve onboarding convert trial users to paid accounts at significantly higher rates than products requiring manual activation steps. Removing human touchpoints from tenant creation directly determines whether the business can grow without proportional increases in operational headcount.
Step 4: Connect Subscription Billing Without Touching Code
Multi-tenant SaaS lives and dies on its billing infrastructure. You need to charge each tenant correctly, handle plan upgrades and downgrades, manage failed payments, and enforce feature limits based on the active plan. For straightforward Stripe integration, describe your billing model clearly:
Example Billing Prompt
“Each tenant subscribes to one of three plans: Starter at $29/month, Growth at $79/month, Scale at $199/month. After a 14-day free trial, restrict access to paid features until the tenant has an active subscription. Starter tenants can have up to 5 users. Growth allows 20. Scale is unlimited.”
That description generates the Stripe Checkout flow, the webhook listener for subscription status events, and the feature gate logic that checks plan entitlements on each protected route.
One specific thing to include in your billing description: what the app does when a subscription lapses. A hard lockout is aggressive and drives churn from accidental payment failures. A grace period of 7 to 14 days of read-only access is standard practice. According to Stripe, automated payment recovery workflows recover a meaningful share of revenue that would otherwise be permanently lost to failed payments — specify this in your prompt rather than patching it in after the first customer churns.
Where billing gets more nuanced is metered or usage-based pricing — charging per seat, per API call, or per unit consumed. This is a legitimate use case for imagine.bo’s Hire a Human feature, where a vetted engineer handles that specific implementation. On the Pro plan, the included 1-hour expert session before launch is exactly the right moment to review billing edge cases with someone who has seen what breaks in production.
Step 5: Deploy, Test, and Verify Tenant Isolation Before Any Real User Signs Up

One-Click Deployment on imagine.bo pushes your frontend to Vercel and your backend to Railway by default. Both are production-grade infrastructure with auto-scaling and SSL. The deployment takes under two minutes. The verification step that follows takes longer and matters considerably more.
The Basic Isolation Test
Create two test tenant accounts using separate email addresses. Log into Account A and create several records. Log out completely. Log into Account B. You should see zero records from Account A — not hidden records, not filtered records. Absolute zero, as if Account A does not exist. Then paste a specific record URL from Account A while logged in as Account B. A correctly built system returns an error or empty state, never the record.
The Real Test: Verify at the API Layer

Security Test: API-Layer Isolation
Most no-code builders test isolation once through the interface and consider it done. The real test is at the API layer. Use your browser’s developer tools or a tool like Postman to make direct API calls to your backend while authenticated as Tenant B: Send a GET request with a Tenant A record ID in the URL while authenticated as Tenant B. Try manipulating your session cookie or JWT to swap the tenant_id claim — the server must reject the modified token entirely, not just ignore the field. Verify that the response is a 403 or 404 — never the actual record. If any of these tests return Tenant A data, your isolation exists only at the UI layer — a presentation filter that any moderately technical user can bypass in minutes. According to OWASP’s 2023 Top 10 API Security Risks, Broken Object Level Authorization is the number one API vulnerability. Server-side tenant validation on every API request is the recognized mitigation, and it must run at the query layer before data is ever returned to the client.
Where Does This Approach Hit Its Real Limits?

No-code is not magic, and the accurate version of this guide acknowledges where the ceiling is. Understanding the limits lets you plan around them rather than discovering them mid-build.
Complex Conditional Billing
If your pricing model involves tiered usage caps, per-feature metering, or add-on modules with overlapping entitlements, AI generation gets you 70 to 80 percent of the way there. The remaining edge cases usually need a human engineer. This is not unique to no-code — billing edge cases are hard regardless of how the system was built.
Custom Subdomain Routing
Subdomain Routing: More Than a 5-Minute Task
Custom subdomain routing — acme.yourapp.com versus beta.yourapp.com — is achievable on imagine.bo but requires more than quick DNS setup. You will need wildcard SSL certificate provisioning (*.yourapp.com), DNS propagation handling with appropriate TTL settings, and routing logic at the infrastructure layer to map subdomains to the correct tenant context. Specify it explicitly in your build description and allocate time for the infrastructure configuration after deployment, which involves steps outside the imagine.bo interface.
Real-Time Multi-User Collaboration
Real-Time Collaboration: A Complex Engineering Problem
Real-time collaboration — where two users see each other’s changes happening live — is technically complex well beyond WebSocket implementation. The hard part is conflict resolution: when two users edit the same field simultaneously, what wins? Production-grade solutions typically use Operational Transformation (OT) or Conflict-free Replicated Data Types (CRDTs) to merge concurrent changes correctly, plus state synchronization logic to keep all clients consistent. If your SaaS requires this, plan to use the Hire a Human feature. WebSocket infrastructure alone does not solve the problem.
Code Portability
Exportable Code: Verify Before You Commit
imagine.bo generates clean, exportable code that you own — unlike platforms like Bubble, where your logic lives inside the platform’s proprietary runtime. That said, portability is only as real as the generated stack allows. Before committing to the platform for a production build, ask specifically: what framework and language is the backend generated in, what database engine is used, and what does the deployment manifest look like? Knowing your stack lets you assess hosting options and migration paths realistically. This is a 10-minute conversation with imagine.bo’s team that prevents a very unpleasant surprise later.
What is not a limit: user authentication, email workflows, Stripe billing, file uploads, search and filtering, role-based access, standard API integrations, and core CRUD operations. These work well without code and cover the vast majority of B2B SaaS products that founders are actually trying to build.
Frequently Asked Questions
Can a non-technical founder actually build a production-ready multi-tenant SaaS without a developer?
Yes, with one honest qualifier: production-readiness depends on your product’s complexity and how precisely you specify the security requirements. For a standard B2B SaaS with user management, subscription billing, and core business logic, imagine.bo’s Describe-to-Build generates working code that deploys to production infrastructure. The specificity of your prompts around tenant isolation, RBAC enforcement layer, and session handling directly determines the security quality of what gets built. For genuinely complex billing or real-time collaboration features, the Hire a Human option covers the gaps without requiring you to hire a full-time engineer.
How does tenant data isolation actually work at the technical level?
In imagine.bo’s generated architecture, every database query includes a tenant ID filter applied server-side at the API layer. This means even if a user manipulates a URL or API call to request a record from another tenant, the backend query returns nothing because the tenant ID in their session does not match the requested record’s tenant association. Critically, tenant ID should be a non-nullable foreign key at the database schema level — this means the database rejects orphaned records structurally, not just through application-layer checks. According to OWASP’s 2023 API Security report, server-side enforcement is the correct standard. UI-layer filtering alone is not true isolation.
What does building a multi-tenant SaaS on imagine.bo cost compared to hiring a developer?
A custom SaaS build from a development agency typically ranges from $75,000 to $300,000 according to Clutch.co’s software development cost benchmarks. On imagine.bo’s Pro plan at $25 per month, you can build and deploy a multi-tenant SaaS MVP for a fraction of that. For scope that needs human engineering, the Done For You option at $499 covers a fully managed build with no ongoing developer salary.
How do I enforce different feature limits for different subscription tiers?
Specify it directly in your Describe-to-Build prompt. For example: “Starter plan tenants can create up to 5 projects. Growth tenants can create up to 50 projects. Scale tenants have no limit. Show a plan upgrade prompt when a tenant hits their limit. All limits must be enforced server-side, not only at the UI.” The AI-Generated Blueprint generates subscription-aware feature gates that check the tenant’s current plan before allowing each action — and the server-side enforcement requirement ensures those gates cannot be bypassed by direct API calls.
Can I move the generated code off imagine.bo if I outgrow the platform?
imagine.bo generates code you own entirely, unlike platforms like Bubble where logic lives inside the platform’s proprietary runtime. Before starting a production build, ask the imagine.bo team to confirm the specific generated stack — framework, language, database engine — so you can assess hosting options and migration paths from the start. Knowing your stack is the precondition for meaningful portability.
Conclusion
Three things matter most when building a multi-tenant SaaS without code.
- Get the data architecture right from day one. Tenant_id must be a non-nullable foreign key at the database level. Specify this in your prompt. An orphaned record in a live production database is not a configuration issue — it is a data breach.
- Specify RBAC and session security explicitly. Server-side enforcement, token expiry, refresh logic, and Super Admin audit logging are not defaults you can assume — they must be in your prompt.
- Test tenant isolation at the API layer before launch. Test with Postman or developer tools, not just browser navigation. Try manipulated tokens and direct record IDs. UI-level isolation is not real isolation.
imagine.bo handles the infrastructure, the security layer, and the deployment pipeline. Your job is to describe the product with enough specificity that the security properties are built in from the start — and to validate them before real users arrive. The included 1-hour expert session on the Pro plan is the right moment to have an engineer review your tenant isolation implementation and sign off on it before you open the doors.
Also Read
Stop Guessing, Start Growing: How AI Uses User Feedback to Build Irresistible SaaS Products

Generative AI for SaaS Documentation and Help Centers: Your Ultimate Blueprint for Smarter Support

How to Deploy Your AI Models: A No-Code Expert Guide
The AI Goldmine: Your Comprehensive Guide to Selling Prebuilt SaaS Templates Made by AI

Unlock Data-Driven Decisions: Your Guide to No-Code AI Analytics Platforms