Getting Stripe running in test mode is straightforward. Getting it running correctly in production, handling real subscriptions, real disputes, real failed payments, and real PCI requirements, is where most integrations quietly break. According to McKinsey, digital payment failures cost businesses an average of 1.4% of annual revenue in involuntary churn and abandoned transactions (McKinsey, 2023). For a SaaS charging $50 per month with 500 subscribers, that is roughly $4,200 per year in losses that most founders never attribute to payment infrastructure. This article covers the five integration-level challenges that cause the most persistent, hard-to-diagnose revenue leakage, starting from environment setup and running through subscription lifecycle management. For context on the specific error codes that surface once your integration is live, this post on Stripe payment processing errors and their fixes covers the diagnostic layer in detail.
TL;DR The five most damaging Stripe integration challenges are environment and key management, subscription lifecycle gaps, PCI compliance failures, checkout architecture mismatches, and dunning and recovery logic. Unlike one-off payment errors, these are structural problems that compound silently over time. According to Stripe, businesses that implement Smart Retries and automated dunning recover an average of 38% more failed subscription payments than those relying on manual follow-up (Stripe, 2024). Getting these five areas right is the difference between a payment integration that works and one that reliably generates revenue.
Why Are Stripe Integration Challenges Different From Stripe Errors?
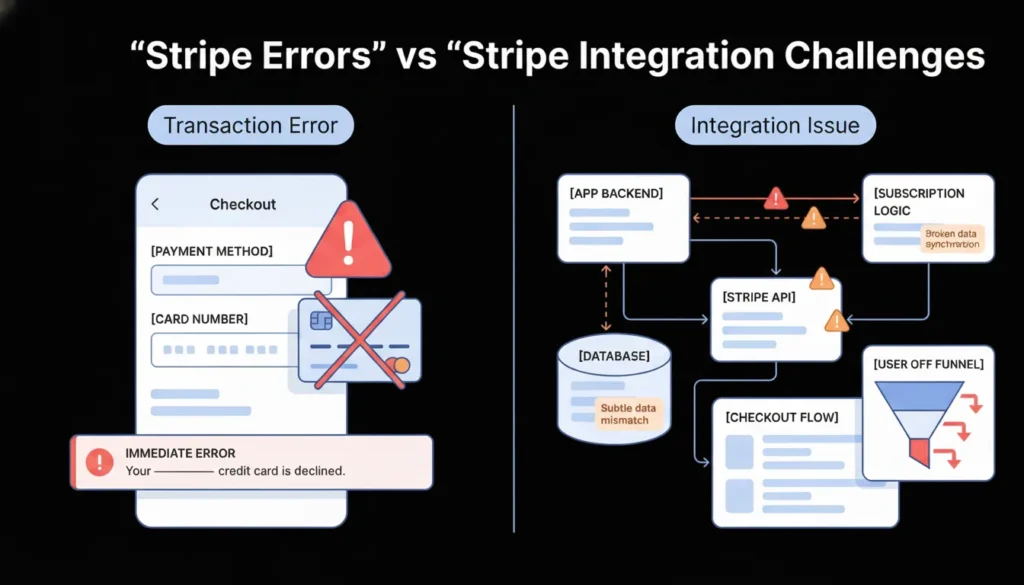
Stripe integration challenges are different from Stripe errors because they are architectural problems rather than transactional ones. A card_declined error happens on a single payment attempt and surfaces immediately. An integration challenge is a structural flaw in how your application is built around Stripe, one that causes failures across many transactions, often silently, and often only becomes visible weeks or months after launch.
Launch Your App Today
Ready to launch? Skip the tech stress. Describe, Build, Launch in three simple steps.
BuildAccording to Stripe’s developer research, the majority of revenue loss attributed to payment infrastructure in production SaaS applications comes from integration-level issues rather than individual transaction errors (Stripe, 2024). These include subscription state mismatches between Stripe and your database, PCI violations that expose you to liability without any visible failure, and checkout flows that create friction or drop-offs at critical conversion points. Each of the five challenges in this article operates at that structural level. They require architectural decisions, not just error handling. For a broader view of how payment integration fits into the full no-code and AI-generated application stack, this post on payment gateway integration in no-code apps covers the integration layer in depth.
Challenge 1: Test and Live Environment Separation
Test and live environment confusion is the most common structural Stripe integration problem, and it is the one that causes the widest range of symptoms. A developer who deploys to production with test-mode keys processes zero real payments. A developer who accidentally uses live-mode keys in a staging environment creates real charges on real cards during testing. Neither failure is immediately obvious without a systematic environment audit. According to Stripe, environment key mismatches are among the most frequently reported issues by developers in their first 60 days post-launch (Stripe, 2024).
Why this challenge runs deeper than a single key swap:
Stripe’s test and live environments are entirely separate. Test-mode webhooks do not fire in live mode and vice versa. Test-mode customers, subscriptions, and payment methods do not carry over to live mode. A Stripe Checkout session created in test mode cannot be completed with a real card. This means environment separation is not just an API key configuration. It affects your webhook registration, your customer database, your product and price IDs, and your testing workflow.
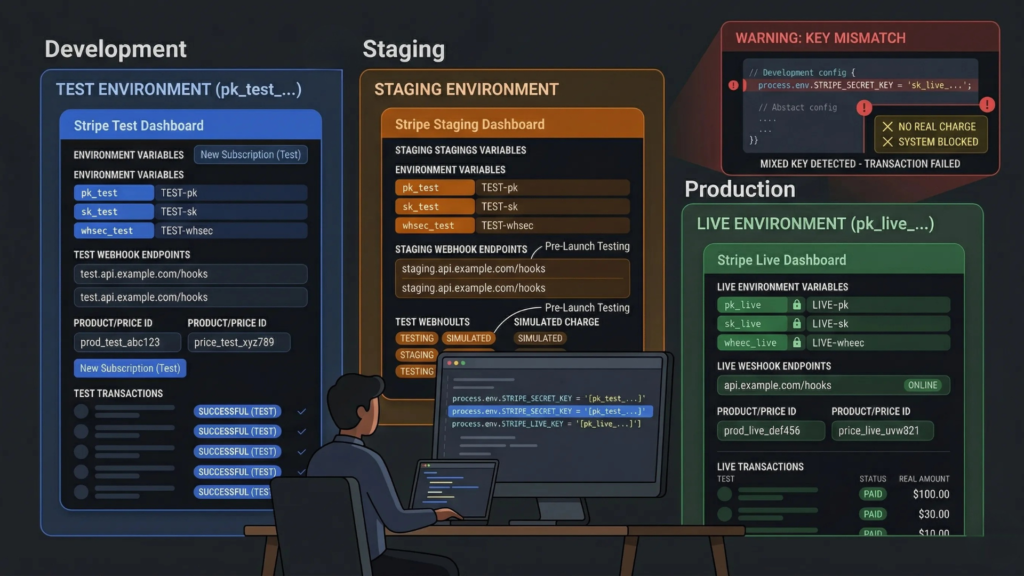
The correct structure is three environments, not two. Development uses Stripe test mode with locally registered webhook endpoints via the Stripe CLI. Staging uses Stripe test mode with a staging-specific webhook endpoint registered in the Stripe Dashboard. Production uses Stripe live mode with a production webhook endpoint. Each environment has its own set of Stripe product and price IDs, its own webhook signing secret, and its own API keys stored in environment variables never hardcoded in source code.
The single most reliable way to confirm correct environment separation before launch is to run this audit in order. First, search the entire codebase for any string starting with sk_ or pk_. If either appears outside an environment variable declaration, it is a security exposure that must be fixed before production deployment. Second, confirm that your staging webhook endpoint is registered with the test-mode signing secret and your production webhook endpoint uses the live-mode signing secret. Third, verify that every Stripe product and price ID in your application configuration matches the correct environment. Price IDs from test mode begin with price_ but are entirely different objects from live-mode price IDs of the same name.
The environment variable structure that prevents this problem:
# Development / Staging (.env)
STRIPE_PUBLISHABLE_KEY=pk_test_...
STRIPE_SECRET_KEY=sk_test_...
STRIPE_WEBHOOK_SECRET=whsec_test_...
STRIPE_PRICE_MONTHLY=price_test_...

# Production (.env.production)
STRIPE_PUBLISHABLE_KEY=pk_live_...
STRIPE_SECRET_KEY=sk_live_...
STRIPE_WEBHOOK_SECRET=whsec_live_...
STRIPE_PRICE_MONTHLY=price_live_...
In imagine.bo-generated applications, include environment variable structure requirements in your initial deployment prompt. For payment integration specifically, use the Hire a Human feature to have a vetted engineer configure and audit the environment separation before your first live transaction. Payment configuration errors are far cheaper to catch before launch than after. For a complete guide to security configuration in AI-generated applications, this post on prompt-based app security best practices covers the full configuration audit checklist.
Citation capsule: Stripe maintains entirely separate API environments for test and live modes, including separate objects, separate webhook event streams, and separate dashboard views. Mixing environment credentials in the same application deployment does not produce a clear error. It produces silent failures where test-mode operations succeed without processing real payments, or where live-mode charges occur in non-production environments (Stripe, 2024).
Challenge 2: Subscription Lifecycle Management
Subscription billing is where most payment integrations move from straightforward to genuinely complex. A one-time charge involves three states: pending, succeeded, failed. A subscription involves dozens: trialing, active, past due, unpaid, canceled, paused, incomplete, and incomplete expired, plus the transitions between them triggered by payment failures, plan changes, cancellations, and reactivations. According to Stripe, subscription state management errors are the leading cause of access control failures in SaaS applications, where users retain access after cancellation or lose access after a successful payment (Stripe, 2024).
The core problem: your database and Stripe fall out of sync:
Most developers make the mistake of updating their own database at the moment the subscription is created or modified, then relying on that local state for access control. This fails in three ways. A payment failure days after subscription creation puts the Stripe subscription in past_due status, but your database still shows active. A user cancels via Stripe’s portal, but your application checks your database subscription field rather than Stripe’s current status. A trial converts to a paid subscription, but your webhook handler does not update the access tier correctly.
The correct architecture treats Stripe as the single source of truth for subscription state and your database as a cache that is always updated by webhooks, never by your frontend or your checkout success flow.
The most common root cause of subscription sync failures is the misuse of the checkout success redirect URL. Many developers update their database subscription status in the success redirect handler because it is the obvious place where they know the payment worked. This is wrong. The success redirect fires client-side, and a customer closing their browser before the redirect completes means your database never gets updated. Worse, the success redirect URL can be visited directly by anyone who knows the URL pattern, whether or not they completed payment. Your database subscription status must only ever be updated by verified webhook events from Stripe, specifically checkout.session.completed, customer.subscription.updated, and customer.subscription.deleted. The success redirect should only display a confirmation message, never update application state.
Subscription events your webhook handler must cover:
javascript
switch (event.type) {
  case 'checkout.session.completed':
    // Activate subscription in your database
    // Set access tier based on price ID
    break;

  case 'customer.subscription.updated':
    // Handle plan changes and trial conversions
    // Update access tier if price ID changed
    break;

  case 'customer.subscription.deleted':
    // Revoke access immediately
    // Retain data per your retention policy
    break;

  case 'invoice.payment_failed':
    // Notify user
    // Begin dunning sequence if applicable
    break;

  case 'invoice.payment_succeeded':
    // Confirm access for next billing period
    break;
}
For multi-tenant SaaS applications where subscription state controls workspace access for multiple users, subscription lifecycle management warrants dedicated engineering through imagine.bo’s Hire a Human feature rather than being handled through prompt iteration alone. A subscription state bug in a multi-tenant system can simultaneously revoke access for all users in a workspace or grant access to users whose billing has lapsed. This post on how to launch a subscription-based app without developers covers the full subscription architecture for no-code and AI-built SaaS products.
Citation capsule: Stripe’s subscription object can exist in eight distinct states, and each state transition is triggered by a specific combination of payment outcomes, plan changes, and administrative actions. Stripe recommends that developers handle a minimum of five webhook event types to maintain accurate subscription state in their application database, because any unhandled event creates a divergence between Stripe’s authoritative state and the application’s local subscription record (Stripe, 2024).
Challenge 3: PCI Compliance and Secure Card Data Handling
PCI DSS compliance is the integration challenge most founders skip because it sounds like a concern for large companies. It is not. Any application that touches cardholder data, even briefly, is in scope for PCI compliance, and violations expose you to fines of $5,000 to $100,000 per month from card networks, plus liability for fraudulent charges if a breach occurs. According to the Verizon Payment Security Report, 62% of data breaches in payment environments involve application-level vulnerabilities rather than infrastructure attacks (Verizon, 2023).
The correct architecture eliminates PCI scope almost entirely:
Stripe’s integration options vary significantly in PCI scope. If you build a custom HTML form that collects card numbers and submits them to your server, which then forwards them to Stripe, you are in PCI SAQ D scope. That is the most demanding compliance tier, requiring quarterly security scans, annual audits, and network segmentation controls. Most small businesses and early-stage startups cannot realistically meet those requirements.
The alternative is to never let cardholder data touch your server at all. Stripe’s Payment Element and Stripe Checkout both handle card collection entirely within Stripe’s PCI-certified iframe. Your server receives only a PaymentMethod ID or a PaymentIntent ID, never a card number. This reduces you to PCI SAQ A, the simplest compliance tier, which requires only a self-assessment questionnaire rather than quarterly scans.
The cost difference between building a custom card form versus using Stripe’s Payment Element is substantial when PCI compliance costs are included. A custom form integration in PCI SAQ D scope typically requires $3,000 to $15,000 in annual compliance consulting, quarterly Approved Scanning Vendor fees of $200 to $500, and potential penetration testing costs of $5,000 to $20,000 per year. The Stripe Payment Element reduces that to a self-assessment questionnaire that takes under two hours to complete, at zero direct cost. For a startup integrating Stripe for the first time, the Payment Element is not just the easier path. It is the only financially rational one.
The most common PCI violation in no-code and AI-generated apps:
The most frequent PCI error is logging request bodies that contain card data. When a developer adds request logging for debugging, every POST request to their payment endpoint, if it contains a custom card form submission rather than a Stripe token, logs raw card numbers to their application logs. Those logs are then stored in log management tools, potentially shared with monitoring services, and retained for months. This creates a data breach liability without any malicious action involved.
If you are using Stripe’s tokenized approach correctly, this cannot happen because card numbers never reach your server. If you are using a custom form, ensure your logging middleware explicitly excludes card-related fields before any payment route is deployed to production. For a full security audit approach for no-code applications handling sensitive data, this post on no-code app security best practices covers the implementation checklist in detail.
Citation capsule: Stripe’s Payment Element and Stripe Checkout are PCI DSS SAQ A compliant by design, meaning businesses using them for card collection are only required to complete the simplest self-assessment questionnaire rather than submitting to quarterly network scans or annual audits. This compliance architecture is intentional: Stripe processes card data within its own certified environment and returns only tokenized references to the merchant, eliminating cardholder data from the merchant’s system entirely (Stripe, 2024).
Challenge 4: Checkout Flow Architecture
Choosing the wrong checkout architecture is an integration mistake that costs conversion rate points permanently until it is rebuilt. There are three primary Stripe checkout architectures: Stripe Checkout, the Payment Element embedded in your own page, and a fully custom payment form. Each has a distinct scope of use, a distinct conversion profile, and distinct maintenance overhead. According to Baymard Institute, 17% of checkout abandonments are caused specifically by overly complex or long checkout processes (Baymard Institute, 2024), which means checkout architecture is a direct conversion rate lever.
Stripe Checkout: A hosted payment page managed entirely by Stripe. You redirect the customer to checkout.stripe.com, they pay, and Stripe redirects them back to your success URL. Stripe handles the entire UI, all payment method presentation, 3DS authentication, and tax collection if configured. No frontend payment code to write or maintain. The limitation is customization: Stripe Checkout’s appearance is configurable within defined parameters, not infinitely flexible.
Payment Element: An embeddable component you place directly within your application’s checkout page. The customer never leaves your site. You control the surrounding UI entirely. The Payment Element handles card input, payment method selection, and 3DS flows within Stripe’s PCI-certified iframe. This is the right architecture for applications where the checkout experience needs to feel native to the product, such as a SaaS upgrade modal or a checkout page with custom upsells.
Custom payment form: You build the card input fields yourself using Stripe.js, collect card data in your own UI, tokenize it client-side, and submit the token to your server. This gives maximum UI flexibility but puts you in a higher PCI scope and requires you to handle all the edge cases, from card formatting to error display to 3DS routing, yourself. For most applications this architecture adds complexity without proportional benefit.
The architecture decision that gets founders in the most trouble is building a custom payment form specifically to avoid a Stripe redirect, then discovering months later that it does not handle 3DS authentication. European customers on PSD2-regulated cards silently fail at checkout, because the custom form never implemented the requires_action redirect flow. The fix requires rebuilding the entire checkout component. Choosing the Payment Element from the start handles 3DS automatically, costs nothing in additional development time, and keeps you in PCI SAQ A scope. The marginal UI control from a custom form rarely justifies the cost.
Choosing the right architecture by use case:

For a new SaaS MVP or any application launching for the first time: start with Stripe Checkout for the fastest path to live payments. Migrate to the Payment Element once you have validated revenue and want tighter UI control.
For an established product with a specific checkout UX requirement: use the Payment Element embedded in your own checkout page.
For a consumer product with specific design requirements that Stripe’s components do not support: custom form with Stripe.js, accepting the PCI scope increase and the additional implementation complexity.
For applications built on imagine.bo: include your checkout architecture preference in your payment integration prompt. Use the Hire a Human feature for Payment Element integration specifically, since embedding Stripe’s component correctly within a generated application requires precise configuration of the Stripe.js loading sequence and the PaymentIntent creation flow. This post on common Stripe payment integration challenges explained covers the architectural tradeoffs in more detail.
Citation capsule: According to Stripe, businesses that use Stripe Checkout or the Payment Element rather than custom-built card forms see measurably higher checkout completion rates, attributed to Stripe’s optimized payment method presentation, built-in 3DS handling, and Link one-click checkout for returning customers. The hosted and embedded options also absorb ongoing compliance and authentication requirements automatically as regulations evolve (Stripe, 2024).
Challenge 5: Failed Payment Recovery and Dunning Logic
Dunning is the process of recovering revenue from failed subscription payments. It is the integration challenge with the most direct, measurable revenue impact, and the one most SaaS founders implement too late or not at all. According to Stripe, involuntary churn, meaning subscription cancellations caused by payment failures rather than deliberate customer decisions, accounts for 20 to 40% of total churn for most SaaS businesses (Stripe, 2024). That is a recoverable revenue source that requires no new customer acquisition.
Why payment recovery fails without deliberate dunning logic:
A subscription payment fails. Without dunning logic, one of three things happens. Stripe retries at its default schedule and the customer’s subscription moves to past_due, then eventually canceled, with no customer notification from your application. The customer does not know their subscription lapsed until they try to use a feature and find their access revoked. You lose both the revenue and the customer’s goodwill.
With dunning logic, the sequence is: payment fails, Stripe retries intelligently, your application sends the customer a targeted email explaining the issue and linking to a payment update page, and Stripe’s Smart Retries continue attempting the charge at statistically optimal times based on machine learning models trained on payment recovery patterns.
Implementing Stripe’s built-in recovery tools:
Stripe provides two native recovery tools. Smart Retries automatically retries failed payments at times when the card is most likely to succeed, based on Stripe’s network data. According to Stripe, Smart Retries recover on average 38% more failed payments compared to a fixed retry schedule (Stripe, 2024). Enable Smart Retries in the Stripe Dashboard under Billing > Subscriptions and emails > Smart Retries.
Stripe’s automated billing emails notify customers of failed payments and expiring cards on your behalf. Configure these under Billing > Subscriptions and emails > Manage failed payments. These emails include a Stripe-hosted link where customers can update their payment method without logging into your application.
Building your own dunning sequence for higher recovery rates:
Stripe’s native tools handle the retry mechanics. Your application handles the communication layer. An effective dunning sequence for a SaaS product looks like this:
Day 0 (payment fails): Send an immediate email from your product with a clear explanation and a direct link to update payment method. Do not revoke access yet.
Day 3 (first retry fails): Send a second email with a sense of urgency. Notify the customer that access will be affected if payment is not resolved.
Day 7 (second retry fails): Send a final warning email. Give a specific date for access restriction.
Day 10 to 14: Restrict access to core features but preserve data. Allow the customer to update payment and restore full access without losing their work.
Day 30: Cancel the subscription and archive the account. Send a reactivation email at 60 days.
The most effective dunning intervention is almost never the retry itself. It is the email that tells the customer their card failed before they realize their access is at risk. Most customers with involuntary churn do not intend to cancel. Their card expired, was replaced after a fraud incident, or hit a temporary limit. They do not find out until they are locked out of your product, at which point frustration compounds the problem. A dunning email sent within four hours of the first payment failure, before Stripe has even started retries, recovers a substantial share of failures before they require any retry at all, because the customer proactively updates their card the same day.
For imagine.bo-generated applications, dunning email logic and payment method update flows are the specific tasks most suited to the Hire a Human feature. The email sending sequence, the subscription status checks, and the customer portal integration require precise webhook handling that coordinates multiple events over multiple days. Getting it wrong means either messaging customers who already paid or failing to message customers who are genuinely lapsing. For founders building subscription SaaS products with AI tools, this post on monetizing AI SaaS tools with subscription models covers the monetization architecture alongside the technical implementation.
Citation capsule: Stripe’s Smart Retries use machine learning trained on payment network data to determine the optimal time to retry a failed subscription charge, based on factors including the time of day, the decline reason, and historical success patterns for similar cards. Businesses that enable Smart Retries recover an average of 38% more failed payments than those using a fixed retry interval, which translates directly to reduced involuntary churn without any additional customer acquisition cost (Stripe, 2024).
How to Audit Your Stripe Integration Before Launch
Running a pre-launch audit against these five challenge areas takes under two hours and prevents the most expensive post-launch payment failures. Work through this checklist in order.
Environment separation: Confirm that production environment variables contain live-mode keys. Confirm that no sk_ value appears hardcoded in source code. Confirm that production and staging use separate webhook endpoints with separate signing secrets.
Subscription lifecycle: Identify every place in your application that reads subscription status and confirm it reads from a database field that is updated exclusively by webhook events. Remove any subscription state updates from checkout success redirect handlers.
PCI compliance: Confirm that your checkout architecture uses Stripe Checkout, the Payment Element, or Stripe.js client-side tokenization. Confirm that no payment route logs request bodies. Confirm that your Stripe API secret key is never referenced in any frontend code.
Checkout architecture: Test your checkout flow with Stripe’s 3DS test card 4000002500003155. Confirm that the authentication flow completes correctly and the payment succeeds after the 3DS challenge. If it does not, your integration does not handle requires_action correctly.
Dunning logic: In your Stripe Dashboard, confirm Smart Retries is enabled. Confirm that at least one customer-facing email is configured for failed payments. Confirm that your webhook handler processes invoice.payment_failed events and triggers your notification sequence.
For applications built on imagine.bo’s platform, use the Hire a Human feature specifically for the subscription lifecycle webhook handler and the dunning sequence implementation. Both require coordinated multi-event logic that benefits from engineering precision rather than iterative prompt refinement. For a comprehensive guide to common integration mistakes in no-code SaaS applications beyond payment processing, this post on common mistakes in no-code SaaS development and how to avoid them covers the full integration pattern.
FAQ
What is the fastest way to get Stripe running correctly in a no-code or AI-built app?
Use Stripe Checkout for your first payment integration rather than the Payment Element or a custom form. Stripe Checkout requires the least implementation code, handles PCI compliance automatically, manages 3DS authentication without custom logic, and gets you to live payments in the shortest time. According to Stripe, Stripe Checkout and the Payment Element together handle the majority of production payment volume because they abstract the complexity of payment method handling, fraud detection, and regulatory compliance from the application layer (Stripe, 2024). Migrate to the Payment Element for tighter UI integration once you have validated revenue. For a step-by-step guide to building a SaaS with payment processing from a plain English prompt, this post on how to build a SaaS with AI and no-code covers the full build workflow.
How do I handle subscription upgrades and downgrades in Stripe?
Subscription plan changes use Stripe’s stripe.subscriptions.update() method with the new price ID. The key decision is proration handling: whether to credit the customer for unused time on the old plan and charge immediately for the new plan, or to switch plans at the next billing cycle. Stripe handles proration automatically by default, creating a proration invoice at the time of the change. According to Stripe documentation, the correct approach for SaaS upgrade flows is to create a preview invoice first using stripe.invoices.retrieveUpcoming() so you can show the customer exactly what they will be charged before confirming the change, which reduces support requests and disputes from customers surprised by prorated charges.
Should I use Stripe Billing or build my own subscription management?
Use Stripe Billing. Building custom subscription management on top of Stripe’s core payment API is one of the most common integration mistakes founders make when they feel Stripe Billing’s abstractions are unnecessary for a simple use case. Stripe Billing handles trial periods, proration, metered billing, invoice generation, tax calculation, and payment retry logic. Replicating even a subset of those features manually using Stripe’s base API takes weeks and produces a system with less reliability than Stripe Billing’s battle-tested implementation. The only scenario where custom subscription management is justified is when your billing model is unusual enough that Stripe Billing’s primitives genuinely cannot represent it, which is rare at the early product stage.
How does Stripe handle the EU’s Strong Customer Authentication requirements?
Stripe automatically triggers Strong Customer Authentication (SCA) and 3DS2 authentication for European cards subject to PSD2 when using the Payment Element or Stripe Checkout. Your application receives a requires_action status on the PaymentIntent when SCA is triggered, and Stripe’s components handle the authentication redirect and return flow. For subscriptions, Stripe uses off-session payment handling for recurring charges after the initial authenticated charge, which exempts most recurring transactions from SCA requirements under the fixed-amount exemption. According to Stripe, businesses that use the Payment Element handle SCA automatically without any additional implementation code (Stripe, 2024).
When should I use imagine.bo’s Hire a Human feature for Stripe integration?
Use Hire a Human for four specific Stripe integration tasks: webhook signature verification and event handler implementation, subscription lifecycle state management across multiple event types, 3DS authentication flow handling in custom payment forms, and dunning sequence implementation with multi-day notification logic. These four areas require precise implementation where an error produces silent revenue failures rather than visible bugs. All other aspects of Stripe integration, API key configuration, basic Checkout redirects, and customer-facing error messaging, are well within what imagine.bo’s Describe-to-Build workflow handles correctly from a well-structured prompt. For foundational security practices that apply to all payment integration work in AI-generated applications, this post on no-code app security best practices covers the security layer systematically.
Conclusion
Three things determine whether a Stripe integration generates revenue reliably or leaks it silently. First, environment separation is the foundation. Every other integration decision sits on top of whether your test and live configurations are correctly isolated. Get this wrong and nothing else matters. Second, subscription state must live in Stripe and be reflected in your database through webhooks, never updated through checkout redirects or client-side logic. A subscription sync error in production is invisible until a customer notices their access is wrong, at which point the relationship is already damaged. Third, dunning logic is not optional for any subscription business. Involuntary churn from failed payments is a recoverable revenue source. Stripe’s Smart Retries and your own dunning email sequence together recover a meaningful share of it without any additional acquisition cost.
imagine.bo’s Pro plan includes access to the Hire a Human feature with a 20% discount on engineering tasks and a one-hour expert pre-launch session. Use that session specifically for a Stripe integration audit before your first live transaction. Catching a webhook misconfiguration or a subscription state bug in that session costs far less than the compounding revenue leakage of discovering it three months after launch. For a practical walkthrough of building and launching a subscription SaaS on imagine.bo from a plain English prompt through live payments, this post on how to launch a subscription-based app without developers is the most direct next step.
Related Articles
- Troubleshooting Stripe Payment Processing Errors
- Future-Proof Your Business: A Comprehensive Guide to Integrating No-Code Tools
- AI Website Builder for Online Stores: Launch Your E-commerce Brand Without Writing Code
- E-Commerce Website Builder: Build & Launch Faster with AI
- App Building AI: Create Powerful Apps Without Writing Code in 2025
Launch Your App Today
Ready to launch? Skip the tech stress. Describe, Build, Launch in three simple steps.
Build